Garrattfan's Modelrailroading Pages
NS 6200 class
Detailing the NS6200
| In June and July 2011 I was in a rush to finish the loco before the summer pause for two reasons. I had already experienced that a summer pause lasts until November - December because there's always so much ado after the summer. Second there is a beautiful box in my room begging "build me, build me". This lovely little bastard calls himself an AD60 Garratt.... Most of the work pictured below was done in a few days in June - July 2011. Despite the rush I didn't finish the 6200 before the summer though and indeed it was not before the very end of December before I took up modelling again. |
|
| As discussed in the Parts page there is a lot of detailing to do. Oh boy, fun!! | |
  |
First I provided the feed water pump with a support to stand on its own. The prototype seems to have a similar arrangement but I could not get a clear picture of it. The support was made of a scrap brass strip, carefully bent over a milled fold line and tapered on the top to get a snug fit to the boiler. I also drilled the holes to receive the piping. |
 |
The feed water heater is a gem! Again I did some drilling to accommodate the piping. This time the support was included in the kit. |
 |
Space is at a premium and it takes some careful consideration to position the feed water heater and the feed pump. Photos of the prototype are a treasure!! |
 |
On the prototype the lower part of the air pump extended through the foot plate. So prior to mounting on the foot plate the air pump needs to be shortened a little. |
 |
A support was provided for the air pump as well, but I considered it to be very crude and there was sufficient room to attach the pump directly to the foot plate and the boiler. |
 |
The foot steps and head lamps were soldered into place. They were soldered in the back of the buffer beam and then bent forward to mimic the prototype's arrangement. |
 |
Other steps as well. Tedious work, these steps size a few millimeters by even less millimeters. |
 |
Fitting the dome presented a challenge. It was a hollow pressed brass thing without a center pin to position it easily on the boiler. Glueing it directly to the boiler would always be a nuisance. Glue it before painting and there will be a lot of masking to do. Glue it after painting and it will always be a very delicate thing. Bump it and it will tear the paint off. First I filed the rim thin and formed it to fit exactly over the boiler's contour. |
 |
I attached the bolt to the boiler with two nuts. The length of the bolt was such that the dome would just fit over it without being lifted from the boiler. I applied a drop of five minute epoxy glue, put the dome over it and let it cure for 24 hours. |
 |
Tada. The dome can now effortlessly be removed by "unnutting" the bolt from the inside. |
 |
On the rear end the steps and raised coal bunker where fitted. |
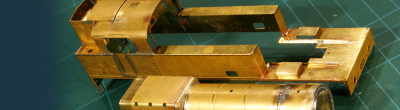
| By now the superstructure had progressed to the state pictured below. I also bent all the piping and handrails needed. I did not fit them though. I will fit them after the paint job. I will blacken them chemically as paint has proved very vulnerable on these small parts while building the NGG16. I will also add the buffers and couplings later as they contain moving parts and I do not want to disturb their good working. | |
 |
|
 |
|
 |
|

Sign my
GuestBook